Orbit is a powerful library for data management, and Ember-Orbit integrates it nicely with Ember. It allows you to set up sophisticated data flows among multiple sources–but how these work can be hard to understand when you’re getting started. Let’s walk through setting up Ember-Orbit in a tiny app, to give us access to both read and write data while offline, then sync up when we come back online. Almost all the steps in this app follow what’s in the official Orbit and Ember-Orbit getting started guides, but we’ll also see concrete examples of what functionality each step adds to the app. You can also download the complete working Ember app.
You can also watch a meetup talk version of this tutorial:
The example app we’ll build is the start of a messaging app. We’ll build a feature allowing us to send a new message and show it in a list:

Setting Up the Backend
The backend for our app will be a Rails API, offline-api. It’s set up following the pattern of ember-orbit’s peeps-uuids example. Follow the instructions in the readme to download and set it up. Run the API using the command bin/rails s.
Note that instead of using autoincrement integers for the primary keys, this API uses UUIDs assigned by the frontend. Orbit is set up to handle IDs this way by default. This allows multiple uses to create records locally even when the backend isn’t accessible, without ID conflicts.
Installing Orbit
To get started on the frontend, create a new Ember app:
# ember new offline-ember
Install the ember-orbit addon:
# ember install ember-orbit
In our app, Ember-Orbit will fill the role that Ember Data does in standard Ember apps, so you should remove Ember Data:
# npm uninstall ember-data --save
We’re going to be using Orbit to store data to a JSON API and an IndexedDB database, so we need to add npm packages to support both of these:
# npm install --save @orbit/indexeddb \
                     @orbit/indexeddb-bucket \
                     @orbit/jsonapi
To make these NPM packages available to your Ember app, add them to ember-cli-build.js:
 module.exports = function(defaults) {
   let app = new EmberApp(defaults, {
+    orbit: {
+      packages: [
+        '@orbit/indexeddb',
+        '@orbit/indexeddb-bucket',
+        '@orbit/jsonapi',
+      ],
+    },
   });
Store: Storing Records In-Memory
By default, Ember-Orbit creates an in-memory Store for holding data. This only runs as long as your app does, so you wouldn’t want to use Orbit with only this Store set up in a real app. But it’s useful for us to see what it does on its own.
Let’s start with defining the model for the message. Create an app/models/message.js and add the following:
import {
  Model,
  attr,
} from 'ember-orbit';

export default Model.extend({
  text: attr('string'),
});
This trivial model isn’t all that different from an Ember Data model; we just import Model and attr from ember-orbit instead of ember-data.
Next, let’s load our messages in the model hook of the index route:
app/routes/index.js:
import Route from '@ember/routing/route';

export default Route.extend({
  model() {
    return this.store.liveQuery(q => q.findRecords('message'));
  },
});
We access this.store as usual, but now instead of an Ember Data store it’s an Ember-Orbit store. So instead of calling Ember Data’s findAll() method, we use Orbit’s liveQuery(). As you can probably guess, this queries for records of type ‘message’ to show on the index route.
Next, let’s create the template for the route:
app/templates/index.hbs:
<form onsubmit={{action 'addMessage'}}>
  {{input value=newMessage}}
  <button type="submit">Add Message</button>
</form>

<ul>
  {{#each model as |message|}}
    <li>{{message.text}}</li>
  {{/each}}
</ul>
This template looks just like one we might have built in any Ember app. We create a form that binds a text value to the controller, and can be submitted to an action on the controller. The model we loaded in the route is an array of messages, which we display in a list.
Now we need to implement the addMessage action on the controller.
app/controllers/index.js:
import Controller from '@ember/controller';

export default Controller.extend({
  actions: {
    addMessage(e) {
      e.preventDefault();
      this.store.addRecord({ type: 'message', text: this.newMessage });
      this.set('newMessage', '');
    },
  },
});
Note that the way we access the model is also different: instead of Ember Data’s createRecord(), we use Orbit’s addRecord(). Also, there’s no .save() step: we’ll add persistence in a different way. Note that we also include the type of the record in the object literal, rather than passing it as the first parameter.
At this point, if you run your app, you should see that you can add messages to the list. But if you refresh the page, they’re gone. We need to get back up to parity with Ember Data’s features: saving and loading records via an API.
One interesting thing to note: we’re going to add a lot of new files from here to incrementally improve the functionality of our data layer, but we won’t need to change the above files at all! This is the power of Orbit’s primitives: our business logic stays just the same (query the messages, add a message) but we change the configuration of what those concepts mean.
JSONAPISource and Push: Sending Updates to the Server
To add features to our Orbit configuration, we’ll start with saving to the server. First, we’ll define the remote data source that is our JSON API server:
app/data-sources/remote.js:
import JSONAPISource from '@orbit/jsonapi';

export default {
  create(injections = {}) {
    injections.name = 'remote';
    injections.host = 'http://localhost:3000';

    return new JSONAPISource(injections);
  },
};
Our remote.js adds the remote service, but it isn’t automatically wired up to anything. We need to create a “strategy”, a preconfigured Orbit object that configures multiple sources to talk to one another. Let’s create a strategy that says that every time we update our in-memory store, we should update the remote store too:
app/data-strategies/remote-update.js:
import { RequestStrategy } from '@orbit/coordinator';

export default {
  create() {
    return new RequestStrategy({
      name: 'remote-update',

      source: 'store',
      on: 'beforeUpdate',

      target: 'remote',
      action: 'push',

      blocking: true,
    });
  },
};
This says that before every update to the store, we should push the corresponding changes to the remote store. “Blocking” means that the remote push must succeed before the local change is allowed to proceed; we’ll learn more about this option later.
For strategies to run, we need to enable Orbit’s coordinator. It’s created for us when our app starts, but not activated automatically; we’ll see why later. Let’s activate it in our application route:
app/routes/application.js:
import Route from '@ember/routing/route';
import { inject as service } from '@ember/service';

export default Route.extend({
  dataCoordinator: service(),

  beforeModel() {
    const coordinator = this.dataCoordinator;
    return coordinator.activate();
  },
});
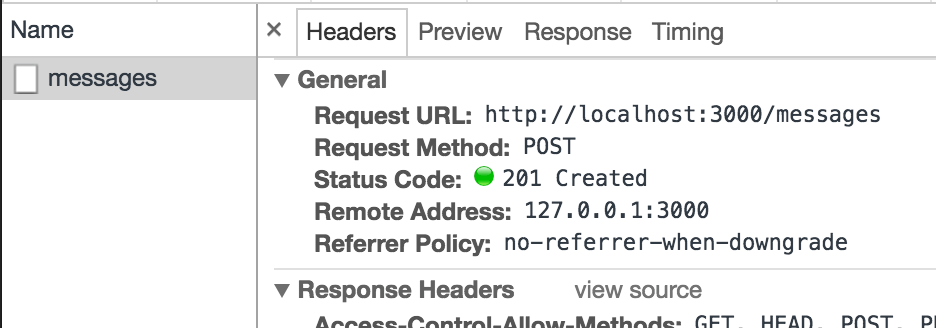
Now if we run our app and check the network tab of our browser, every time we add a message we’ll see an outgoing POST request to our API, and a 201 Created response:
EventLoggingStrategy: Console Output
To see what’s happening in more detail, let’s add event logging so we can see it in the browser console.
app/data-strategies/event-logging.js:
import { EventLoggingStrategy } from '@orbit/coordinator';

export default {
  create() {
    return new EventLoggingStrategy();
  },
};
Now when you reload your app you’ll see a few log entries immediately:

When you add a message, you’ll see a number of additional entries:

What each of these mean in detail are beyond the scope of this blog post, but in general you can see that data is being pushed to the remote server and updated in the local store.
Pull and Sync: Querying Data from the Server
We’re saving data to the server, but if you reload your app you’ll notice we aren’t loading the data yet; we simply query the in-memory store. What we want to do is, every time the in-memory store is queried, we want to query the remote store first.
app/data-strategies/remote-request.js:
import { RequestStrategy } from '@orbit/coordinator';

export default {
  create() {
    return new RequestStrategy({
      name: 'remote-request',

      source: 'store',
      on: 'beforeQuery',

      target: 'remote',
      action: 'pull',

      blocking: true,
    });
  },
};
This says that before the local store is queried, pull from the remote store.
If you reload your app, this isn’t enough to get the data load working. We also need to sync the data. The data is pulled down from the server, but it’s left in limbo; it isn’t transferred into our store. We need a sync strategy to do that:
app/data-strategies/remote-sync.js:
import { SyncStrategy } from '@orbit/coordinator';

export default {
  create() {
    return new SyncStrategy({
      name: 'remote-sync',

      source: 'remote',
      target: 'store',

      blocking: false,
    });
  },
};
Now if we reload our app we’ll see all the data from the server appear upon load. When we add messages, they’re added both to our local store and to the remote API.
Now we’ve replicated the functionality of Ember Data. It took some work to get there! But now’s where that work pays off; we can start adding offline storage and synchronization features.
IndexedDBSource: Persisting Data Locally
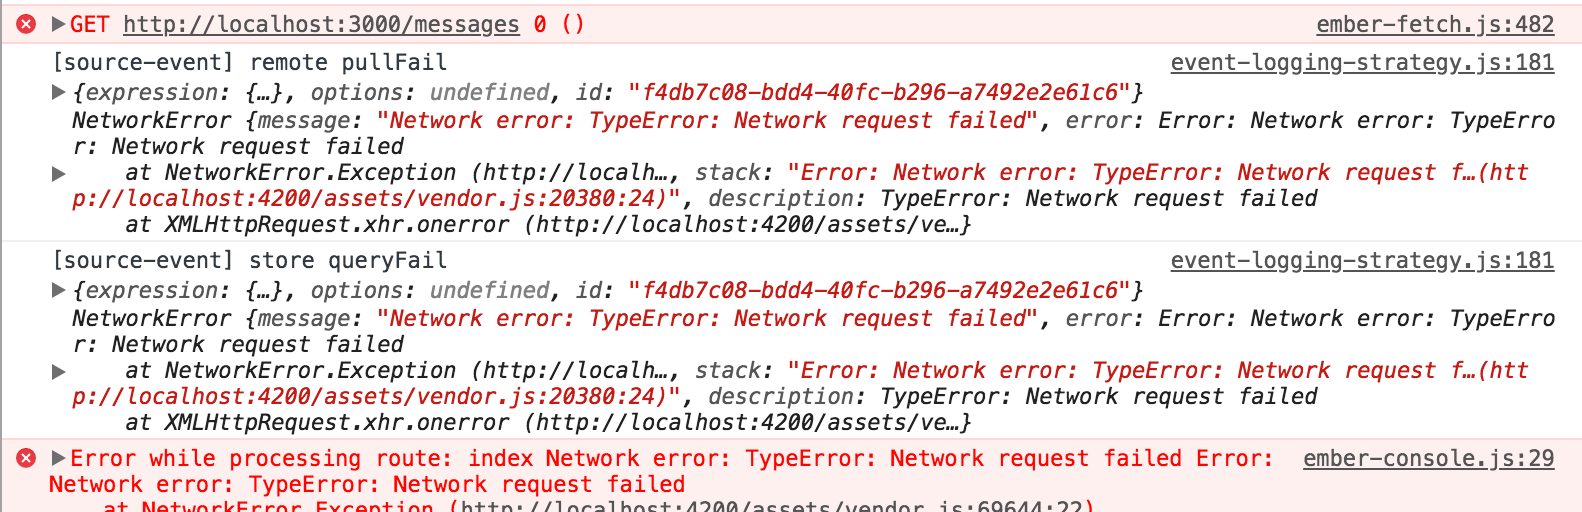
Right now our app requires us to be online; if the API server isn’t reachable, the app won’t even launch. To confirm this, stop the Rails API server by pressing control-C in the terminal that’s running the Rails server. Reload your Ember app. You’ll see a blank white screen and an error in the console.
If we backed up our data locally in the browser, we would be able to load it even if the server wasn’t reachable. (We could even use the ember-service-worker addon to allow our static assets to be loadable even when the device has no internet connection at all. We won’t get into that in this post, but give it a try on your own!)
Ember-Orbit will allow us to store our data locally like that, using the IndexedDB browser technology. (There is also a Local Storage option you can fall back to, but the most common browsers in 2018 support IndexedDB, so you’re probably fine without Local Storage.) We installed the NPM Orbit packages to support IndexedDB earlier.
First we’ll create an IndexedDB store called “backup”:
app/data-sources/backup.js:
import IndexedDBSource from '@orbit/indexeddb';

export default {
  create(injections = {}) {
    injections.name = 'backup';
    injections.namespace = 'messages';
    return new IndexedDBSource(injections);
  },
};
Next we’ll create a strategy that takes all changes to the store and syncs them to the backup:
app/data-strategies/store-backup.js:
import { SyncStrategy } from '@orbit/coordinator';

export default {
  create() {
    return new SyncStrategy({
      source: 'store',
      target: 'backup',
      blocking: true,
    });
  },
};
Note that we configure the strategy to be blocking to ensure that changes are successfully stored to the backup.
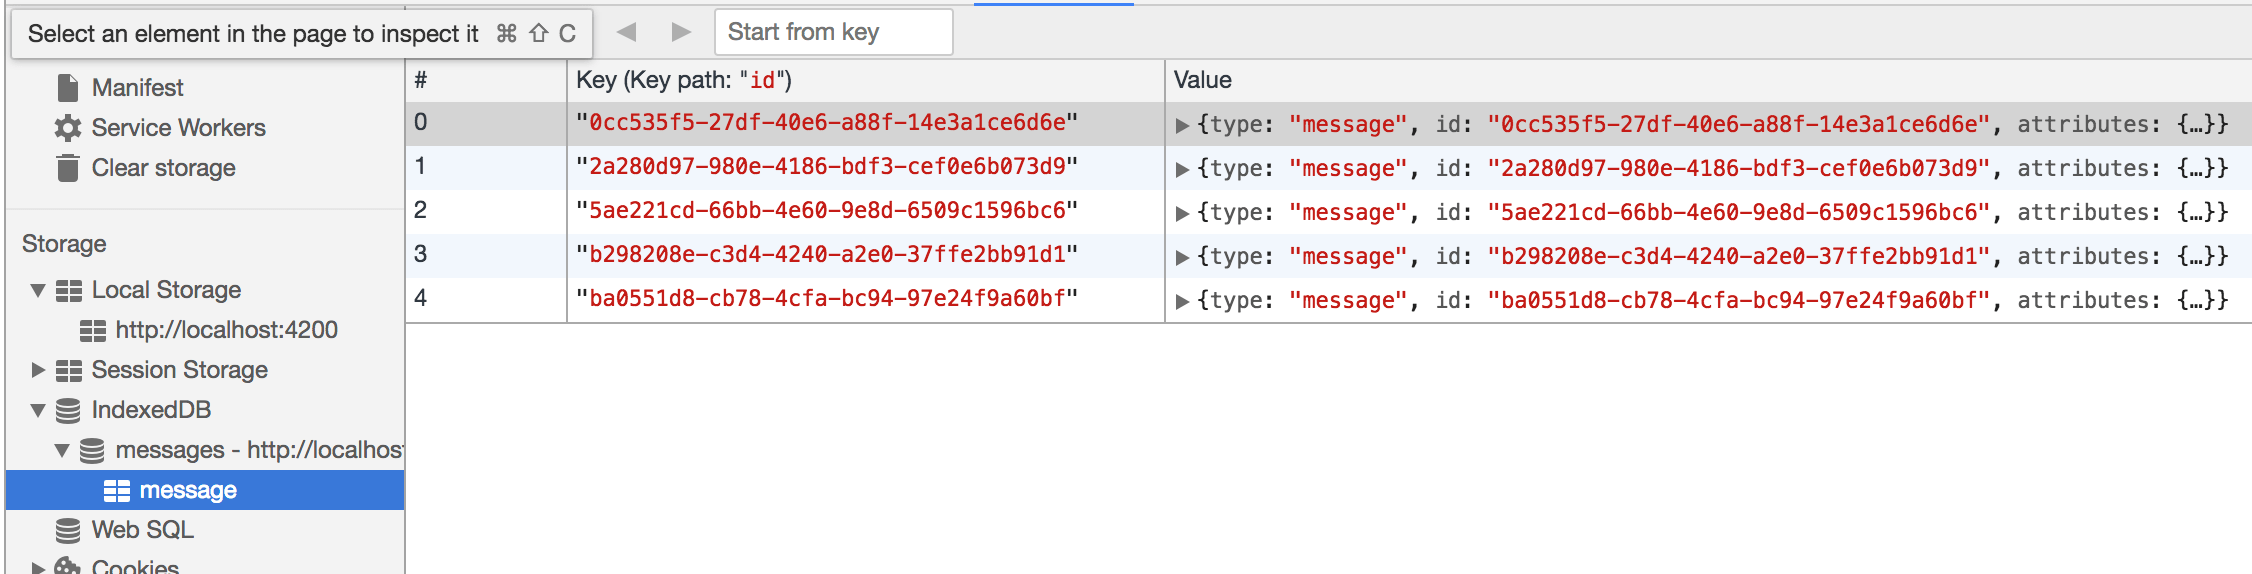
Start the API again with bin/rails s, then reload your Ember app. Check your IndexedDB storage in your browser’s developer tools:
- Firefox: Storage > Indexed DB
- Chrome: Application > Storage > IndexedDB
- Safari: Storage > Indexed Databases
You should see your message data saved there.
It doesn’t do us a lot of good yet, though. Stop the Rails API then reload your Ember app. You’ll still get the same blank screen.
The problem is that we’ve configured the request to the remote API to be blocking. This means that if it fails the app can’t continue. Instead, we want to continue on in the app while the remote API call is running, or even if it fails. In Jake Archibald’s Offline Cookbook, he refers to this as the “cache then network” pattern.
Making this change is as simple as reversing a boolean in our remote-request strategy:
api/data-strategies/remote-request.js:
       target: 'remote',
       action: 'pull',

-      blocking: true,
+      blocking: false,
     });
   },
 };
Now when we load our app and the remote request fails, the app’s UI loads anyway. That’s better, but we still don’t have any data. As our last step to put the backup to use, we need to load the data when the app launches. This involves doing some store operations manually:
app/routes/application.js:
   dataCoordinator: service(),

   beforeModel() {
     const coordinator = this.dataCoordinator;
-    return coordinator.activate();
+    const backup = coordinator.getSource('backup');
+
+    return backup.pull(q => q.findRecords())
+        .then(transform => this.store.sync(transform))
+        .then(() => coordinator.activate());
   },
 });
We query all records from the backup, then sync them into the store. This effectively restores the backup. Reload the app, and you should see the data restored even though the API is down!
Earlier we noted that the coordinator isn’t activated upon app launch. And now we see why: you may want to perform manual actions on your store before the coordinator is activated, and this gives you the opportunity to do so.
We can read our data while offline, but we still can’t write it while offline. If we try to add a message while the API is down, we get a console error, and the message doesn’t appear in our list.
To make it appear, the first thing we need to do is to make the remote-update strategy non-blocking, like we did earlier for the remote-request:
app/data-strategies/remote-update.js:
       target: 'remote',
       action: 'push',

-      blocking: true,
+      blocking: false,
     });
   },
 };
Rerun the app and add a message, and it appears in the app. But this is a lie. This data isn’t stored to the server-side API! This means that it won’t be accessible on other devices, or to other users if the data is shared. And if the user clears their browser storage data, the data will be lost forever!
Start the Rails API back up and reload the Ember app. The new message still appears locally. But let’s check on the server as well. In a new terminal window, go to the API folder and run bin/rails c, then enter the command Message.pluck(:text). The new message you added doesn’t appear.
This is kind of what we expect; it would be pretty advanced for an app to be able to keep track of updates made while offline and sync them up when it comes back online. But this is exactly what Orbit allows us to do!
IndexedDBBucket: Queueing Updates for When You Come Online
We can use a feature of Orbit called a “bucket” to keep track of transformations that fail, so they can be retried later.
First we create the bucket itself.
app/data-buckets/main.js:
import IndexedDBBucket from '@orbit/indexeddb-bucket';

export default {
  create() {
    return new IndexedDBBucket({ namespace: 'messages-bucket' });
  },
};
Next, we need inject this bucket into our application so it’s available to be used. We can do this in an Ember initializer:
app/initializers/orbit.js:
export function initialize(application) {
  application.inject('data-source', 'bucket', 'data-bucket:main');
  application.inject('data-key-map:main', 'bucket', 'data-bucket:main');
}

export default {
  name: 'orbit',
  initialize
};
Now we can test to make sure in-flight requests are retried when you come online. Unfortunately the previous request you made is lost. But we can create a new one.
Stop the Rails API. Reload the Ember app and create a new record. Start the Rails API, then reload the Ember app again. Amongst the console log entries you should see a remote push entry. Expand the details and you’ll see that it’s the record you added while offline. In the Rails console, run Message.pluck(:text) again, and you should see the record that was added while offline, synced up to the server with no effort from you!
Next Steps
There are a few different places you can go from here.
- Log truncation. This is a different concept than the console logs created by the EventLoggingStrategy; it relates to Orbit’s internal logs of transformations that happen. This strategy will clear out transformation log entries once they’ve been processed by all sources. There’s not really any reason not to use this strategy.
- Error handling for when operations don’t work.
- Informing the user in the UI when records aren’t saved to the server, so they can be warned that they need to connect online eventually.
With this framework of understanding, a good next step would be to read the Orbit guides to understand these fundamental concepts more deeply.